If you live in a place where typhoons or tropical cyclones are almost always coupled with strong winds, you probably already know the importance of properly anchoring your shed. We wouldn’t want you to be one of those who watch their sheds get ripped off the ground and blown into who knows where.
How can you anchor your shed to the ground then? This will depend on the type of terrain you have and the material your shed is made from. But the most common way and by far the most effective is by using concrete piers buried below the frost line to serve as both your shed weight and ground anchor or anchoring to a concrete slab.
In some places, anchoring your shed is part of their building codes, so this cannot be taken lightly. There have been numerous times when flood and windstorms have wreaked havoc in North America, where billions of dollars in terms of properties were damaged. Knowing this, we can automatically see why you need to learn how to anchor your shed to the ground properly. And that is what this article is all about. Let’s begin!
Why You Need To Anchor Your Shed

Before we dive into how you can anchor your shed, let us first know why you need to anchor it. I’ve asked people and read articles about anchoring your shed, and I realized that everything boils down to these three reasons.
Local Ordinances and Regulations
Depending on where you are located, strong gale winds might be part of your weather, or maybe hurricanes and strong typhoons regularly come your way, keeping your sheds, gazebo, and other outhouses well-grounded is a must. In fact, your local government might have an ordinance and building regulation already in place for such structures.
Both Agawam, MA, and Montgomery, IL, have a shed regulation that states, “All shed must be anchored to the ground.” At the same time, Big Lake, MN, takes the law a step further by stating, “Sheds must be anchored by attachment to a slab or in-ground anchors. All corners of the shed need to be anchored.” The law has a good point because these outbuildings, if not properly anchored, can pose a danger to you, your property, your neighbor, and your neighbor’s property. This brings me to my next reason.
Safety Reasons
The reason why you have a shed in the first place is to keep garden items and other stuff safe from the outdoor elements. Your garden tools cannot be kept outside if you want them to last for a long time. Often, sheds are not just used to maintain garden stuff but other, more expensive items like bikes, motorcycles, and vehicles.
Also, by keeping your garden items in the shed. You ensure that your kids will not accidentally trip on a hose or a rake and hurt themselves. If you have pets like dogs who run around the yard, you also keep them safe by putting your things inside the shed and out of their reach. Again, safety is two ways here – you keep your items safe inside the shed while also keeping your kids and pets out of harm’s way.
Protection Both For Your Property And Others.
As I’ve said in the previous section, anchoring your shed is not just to protect your things inside the shed.
A properly anchored shed can be the difference between you paying damages on your property or worse, your neighbor or neighbors property. Anchoring your shed adds strength and stability to the structure so that it does not blow away and lands on someone else’s property.
It’s good to remember that scenarios like the one I described in my previous paragraph spell a lawsuit for some. So spend that extra cash and anchor your shed, your bank account will thank you for it in the future.
Anchoring Your Shed According To Shed Type
There are different ways you can anchor your shed, and these ways will depend on the type of material your shed is made of.
Wood Shed
The most common type of shed you will see is the woodshed. The woodshed is heavier than the other two types below, so it is more structurally sound and stabler. If you think that lawnmower you parked inside the shed is heavy enough, you are dead wrong. You still need to anchor your wooden shed even if it is the heaviest of the three. Plus, the law dictates it, so doesn’t give you a pass on this.
There are several ways you can anchor your shed to the ground. You can use concrete piers, augers, above-ground cables, plates, and bolts. Remember that wood and metal will deteriorate over time if they are in contact with the ground, so anchoring your shed to concrete pads will ensure that your shed will be there even when the next big wind blows.
Here is a step by step guide on how you can anchor your wooden shed to the ground.
- You have to first determine the kind of ground you want to anchor your shed on.
If your shed is built on top of a concrete slab or you’re anchoring your shed on dirt, soil, grass, or gravel, it is very important to determine the ground type. The land where you want to put your shed on might not be flat enough; therefore, you may need to dig or move around some dirt before laying out your framework for a concrete slab or a gravel base. A different approach is to use concrete blocks to make sure that your shed floor is leveled.
- Once you’ve determined what kind of ground then the next step is to find the proper anchors for your shed.
If you’re building a new shed, consider using galvanized anchor bolts or heavy duty galvanized held down by your anchors. Use some concrete expansion anchors or use hold downs with the anchors if an existing slab is already in place. Earth augers with straps or cable are often used on existing sheds and are best suited for grass, hard packed soil and dirt. You can also anchor your shed on sunken concrete piers rather than just anchoring to grass, soil or dirt. The sunken piers can also be used on gravel shed bases.
- Depending on the size of your shed, you will then have to mark, drill holes, screw the augers or dig down depending on the anchors you will be using.
Anchors can be as few as four and can be as many as 24 depending on your shed’s size and the type of anchor you are using. (See “Number Of Anchors According to Shed Size” chart further in the article)
- Next is to place your anchors in.
Your anchors can be anchor bolts, hold downs, brackets, expanding bolts, augers with cables/straps, or a combination of any or all of them. If you are using concrete piers to anchor your shed down, this is the time where you will pour your concrete into the hole before putting your anchor in and letting the concrete dry. The anchor inside the still wet concrete should lean away from the shed to provide better support.
- Tighten the bolts and make sure that you have a washer in place.
If you’re using ground augers, you will then be threading your wires up on one side of your shed wall, through your rafters and then down to the other side of your shed where another auger is also waiting. You will then thread each cable ends through the augers’ loop on each side of your shed and use a cable clamp to secure the cables in place.
- The final check.
Your next step is to make sure that your anchors are secured and tight for existing sheds, and then you’re done. If you’re building a new shed from the ground up or building on top of an existing concrete slab, your next step is to make a final pass on your anchors and double-check that everything is tightened and secured. This is also the best time to make sure that you have adequately bolted the roof together with the walls to make it hurricane ready. Doors and windows are the last things to be placed, and you’re done.
Tip: Some prefer their sheds to be off the ground and rest on elevated foundations. If you think of repurposing your shed later into an outdoor man cave or a tiny home, then an elevated shed is your best bet. The shed will last longer since it is not in contact with the moist ground, and the elevation will make it easier for you to fit in plumbing in the future. (More about anchoring your elevated shed further in the article.)
Metal Shed
Next to wood is the metal shed. It is practically the next best option next to wood because even though it is lighter than wood sheds, it is still more sturdy than the plastic sheds. Metal screws and bolts on metal sheets are always more reliable than metal on plastic.
The procedure of anchoring your metal shed is not as different from the process you take from the woodshed. There are just a few steps you need to do differently depending on the ground you will anchor your shed to.
- Identify the type of ground you will anchor your shed to.
It is important to note that most DIY sheds have either a concrete slab or wood flooring. The concrete slab usually doubles as the anchoring ground for your shed. Depending on how you construct your shed, you can set your anchors before your concrete slab dries, or you can use brackets together with expanding concrete bolts to fasten your shed to an existing slab. Wood floorings are usually constructed on top of a skid, and the main reason is to allow the owner to move the shed easier in the future. If you’re building a metal shed from the ground up with wood flooring, you need to fasten your skid onto the concrete with brackets before putting your flooring frame on top.
- Choose an anchor that is best suited to your shed and ground type.
The most recommended way to anchor your metal shed to a concrete ground is with the use of expanding concrete bolts with L brackets. Check your local regulations concerning outbuildings to learn how many anchors are needed for your shed’s size. A good place to start is to put anchors 12 inches of any corner of your shed and then every 32 inches after that.
Companies of prefab metal sheds usually carry anchor kits in their store, and some even include the anchor kits when you buy their sheds. If your shed sits on top of soil, dirt, gravel, or grass, you might want to get earth augers to anchor your shed. J bolts can be used to anchor your shed if you plan on pouring a new concrete slab for your shed just be sure to follow your local regulation on how many anchors you need to place on a specific size of a shed.
- Mark where your holes and anchors will be and dig or drill depending on your anchor type.
With earth augers, you have two options on how you want to use it. You can literally just screw it in the ground, or you can dig a hole, fill it with concrete and drop your auger in the still-wet concrete. The last option is much more secure and will last you way longer since your augers are pretty much set in concrete. If you’re using expanding bolts, you will have to follow the measurements that your local regulation dictates before drilling, and if you are using J bolts, mark your concrete slab frame where each pin will go.
- Time to place your anchors in.
Most prefab metal sheds are made without floorings, and so the anchors will depend on the type of flooring and ground you are anchoring the shed to. Most commonly, metal sheds are always not set on the ground; instead, they are slightly elevated using concrete blocks or concrete pads if they have wood flooring or placed directly on top of concrete slabs. This ensures that the shed does not touch the ground and has better drainage; therefore, reducing corrosion caused by moisture to your shed.
So again, depending on the type of anchor and ground, this step will either involve placing your brackets and screwing your bolts into the concrete pad then onto the shed wall, dropping your anchors into a hole filled with wet concrete or screwing your augers into the soil. For J bolts, this step involves placing your J bolts into the still wet cement, smooth the surrounding surface you disturbed, tap the pins to release any air pockets inside, and then wait for the cement to dry.
- Tighten those anchor bolts or thread the cable wire.
Combining different anchor types will surely give your shed a chance to withstand the next gust of strong wind or hurricane that comes in your neighborhood. So if you have bolts in place, make sure that you tighten them as much as you can – just don’t overkill it, and if you have augers (either set in concrete or screwed into the ground) then you will have to thread your cable wires in this step. Just be sure that you’ve already put up your walls and roof.
- The final check.
The last and final step is always to double-check your anchors if they are securely in place.
Plastic Shed
Sheds of this material are very light, and anchoring them is a must even if you think you are not in an area where winds blow that hard. You’ll never know what mother nature may bring to your doorstep in the coming days. Better to be safe and ready than sorry.
Anchoring plastic sheds is a little more tricky than metal and wood because screws on plastics are generally not as robust as screws on metal or wood. A light gust of wind may uproot your shed if you rely on just brackets and bolts to anchor your shed. So the best option is to use anchors with straps or cables that go over the roof of your shed. Here is a step by step procedure on how you can anchor your plastic shed more securely.
- Choose the right anchor.
I specifically made this the first step because, as I said at the beginning of this section, screws on plastics are not enough to anchor your shed. Opt for augers with cable ties or straps that go over the roof of your plastic shed to help combat movement if a strong gust of wind blows. You can also combine bolts, screws, and straps to give your light shed more resistance to movements.
- Check local regulation on how many anchors your shed size needs.
Even if your plastic shed has holes that are specifically there to place your anchors in, you still need to make sure that you have enough anchors to adhere to your local laws. So do your due diligence and check with your government.
- Find your anchor spots and drill the holes.
Your plastic shed may come with its flooring that may or may not contain pre-drilled holes for anchors. You need to place just your flooring directly on top of your concrete slab or on top of your skid. Drill down the anchor holes until you reach your concrete slab or skid. Next is you need to mark and dig the spot where your earth augers will be. Depending on how secure you need your shed to be, you can fill the hole with cement or just fill the holes back up with dirt.
- Anchors away: Place your anchors in.
Drop your augers inside the holes, but make sure that your auger heads are leaned away from the shed at about 20° angle. Place and tighten your bolt anchors and then proceed with snapping the walls and roof in place.
- Thread your cable wire or straps.
Alternatively, you can use mobile home tie-downs instead of augers to strap your plastic shed down and prevent it from blowing away. The only difference between your plastic shed and a mobile home is that the straps would go over your shed roof rather than just the strap being looped and drilled or nailed into the floor frame. If you are using earth augers, you will have to thread the cables through the loop at the end of one auger, clamp it in place, pass the cord over your shed roof to the other side where another auger is waiting. Pass the cable through the auger’s loop on the other side, make sure that it is tight before clamping it in place.
- Double check your anchors.
It’s always a wise move to double-check your work and make sure that everything is bolted down properly, including your roof, and that your cables are tight and that your shed is not going to the next town when the next windstorm comes your way.
Anchoring Your Shed According To Foundation Type
You might think that this is repetitive, but I know that not all people have the time to read a whole article on how to anchor your shed. So, I am putting this in writing for those who do skip read and just want to know how they can anchor their shed without all the jibber jabbers. But if you’ve read the article up to this point, you can skip this section or skim through.
Concrete Slab
This can be categorized into two, and we will discuss this very briefly. I promised no jibber jabbers, so I will stick by it.
Brand New Construction
With a brand new construction, you will be pouring cement to create your concrete slab. If this is the case, the best option is to place your anchors after you’ve poured the cement. This will ensure that the anchors will set together with your concrete slab, giving it a better hold.
Existing Concrete Slab
The approach is different if you’ve already got a concrete slab where you want to place your shed on. If you’ve built your shed on a skid, you need to use foundation anchor plates or T-Straps to secure your skids onto the concrete slab. Alternatively, you can use L brackets inside your shed and concrete expanding bolts if you plan to use your concrete pad as your shed floor.
Concrete Blocks or Concrete Piers
The best way to tie down your shed that is on a concrete block or pier is by the use of augers – if your anchoring on dirt, soil or grass, concrete expansion bolts with galvanized steel straps – if you’re tying it down to a concrete slab or use some mobile home tie-down kits.
Since your shed is elevated, you can secure your straps directly to the floor beams before bolting the other end down to the concrete. With augers, it is best to have the cable run up your wall through your roof rafters (if possible) and then down to the other side before securing the wire in place.
Gravel
Gravel is great for water drainage and can help keep your shed base dry and free from moisture and rot. Securing your shed on gravel can be achieved by the use of earth augers set into concrete pillars or some mobile home tie downs.
Pavers
Construction experts strongly suggest not to use pavers as an anchor point for your shed because if you can lift it, then most probably the wind can too. But if you still insist, you can use expanding concrete bolts with L brackets to secure your sheds on pavers.
Soil, Grass, Dirt
You can choose between augers and mobile home tie downs if you will be securing your shed on soil, grass, or dirt. If you prefer a semi-permanent anchor, consider setting your anchors on cement pillars or piers before threading your cables or strapping your home down.
I’ve watched a video where someone used an old paint bucket filled with cement as the anchoring point for his earth augers. All he did was determine where he needed to put his anchors, filled the appropriate number of buckets with cement, dropped the augers inside the bucket at an angle, and waited for the cement to dry.
Once the cement was dry, he dug the anchor holes and dropped the bucket full of cement in. He made sure that the auger heads were pointing away from the shed and proceeded to fill the void back up, making sure that the auger head could be accessed after. From there, he just threaded the cables in, ran it on top of his shed roof, and used clamps to secure the wires.
The Best Anchor To Use For Elevated Sheds
Moisture on wood, plastic, and metal can cause rot and deterioration overtime of having your shed on a raised foundation is a good move. Another reason you elevate your shed if you are constructing a new one is that you can easily convert your shed into a mancave, tiny home, or crafts space in the future and move it elsewhere, plus it’ll be easier for the plumbing.
One more reason why there are elevated sheds is that the ground they are on top of is not level. A shed needs to be set on a leveled ground or slightly sloped land to ensure that no structural damage will arise in the future. I remember in the old days, sheds were off the ground because it helped the farmers prevent rodents and pests from entering the building and eating their stored grains or harvest. I think the idea still applies today.
Since we are dealing with an elevated outbuilding that you want to move somewhere else in the future, the best anchor option would be a mobile home tie-down. You can secure your shed by looping the metal strap onto the floor beams, securing it with nails or screws – if you have metal or wood flooring, or use a long metal strap to go over your roof if you have a plastic shed. It is easy to remove once you decide to repurpose your shed and move it closer, further from your home, or maybe move it to a brand new location.
If you think that you want a semi-permanent anchor for your shed because you don’t see yourself turning your shed into something other than what it is but still want the mobility option, consider setting your auger anchor in cement for a longer lifespan.
The Most Common Shed Anchoring Materials w/ Pictures
There are different anchoring materials you can use depending on the type of your shed and the ground you are anchoring your shed onto. Below are the most common anchor choices you will encounter for your shed needs.
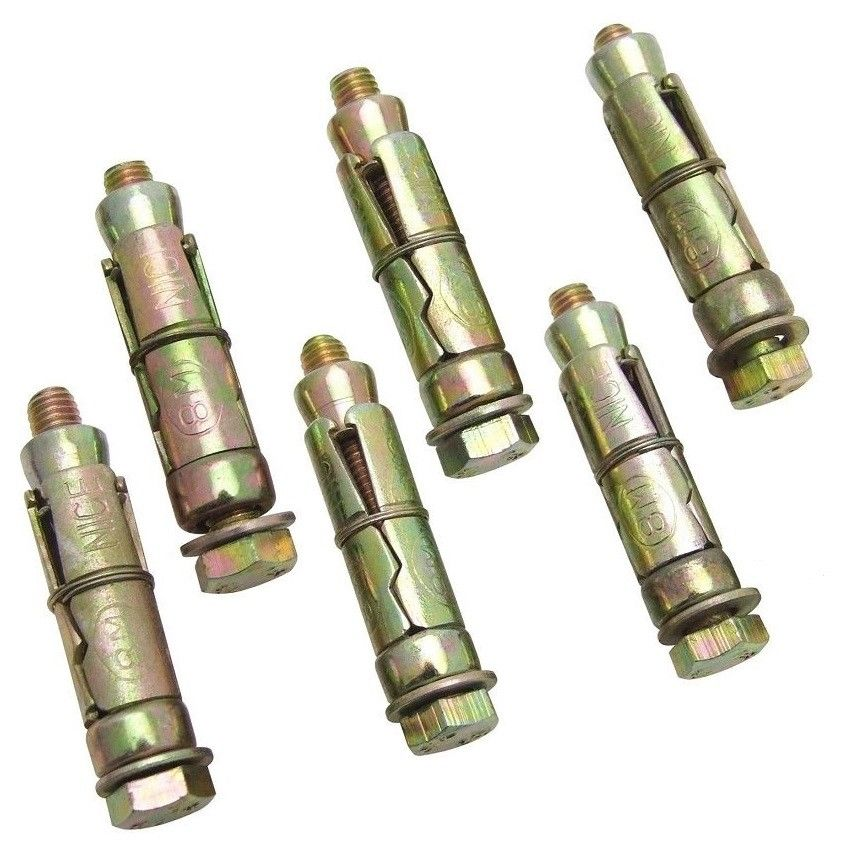
Expansion Bolts And Brackets
The picture below shows some samples of concrete expansion bolts that you can use to anchor your shed onto existing concrete slabs. This bolt is designed to expand after it is installed; therefore, providing resistance and securing your shed in place.
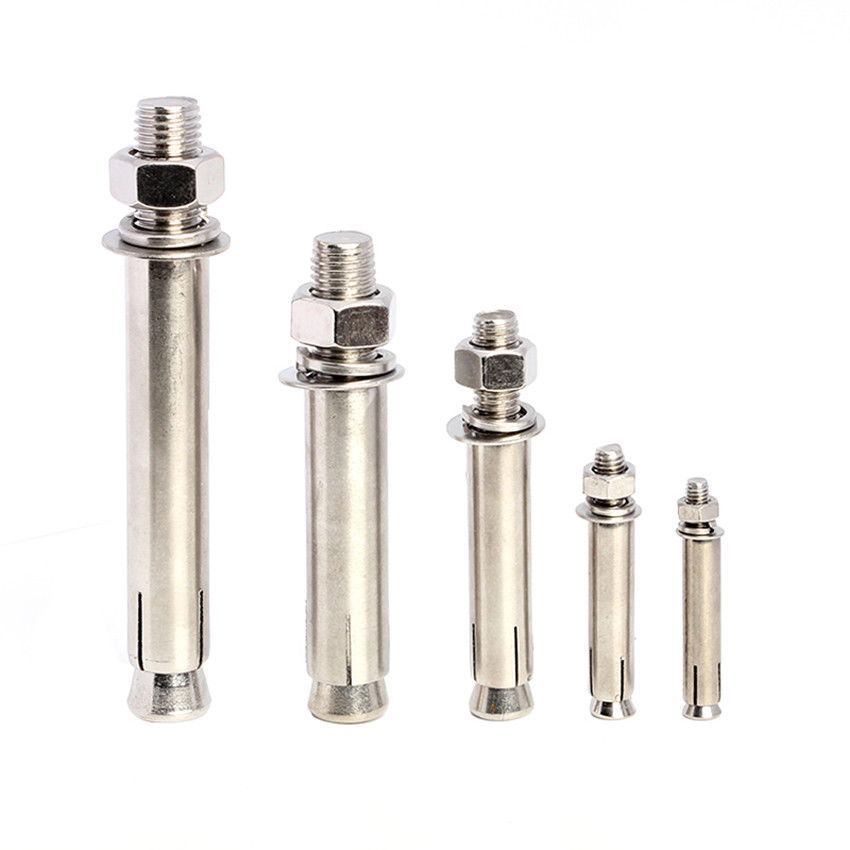
Most often, expanding concrete bolts are used together with different brackets that fasten to the shed walls. One side is secured on the concrete slab while the other side is attached to the shed walls. Check the picture below.
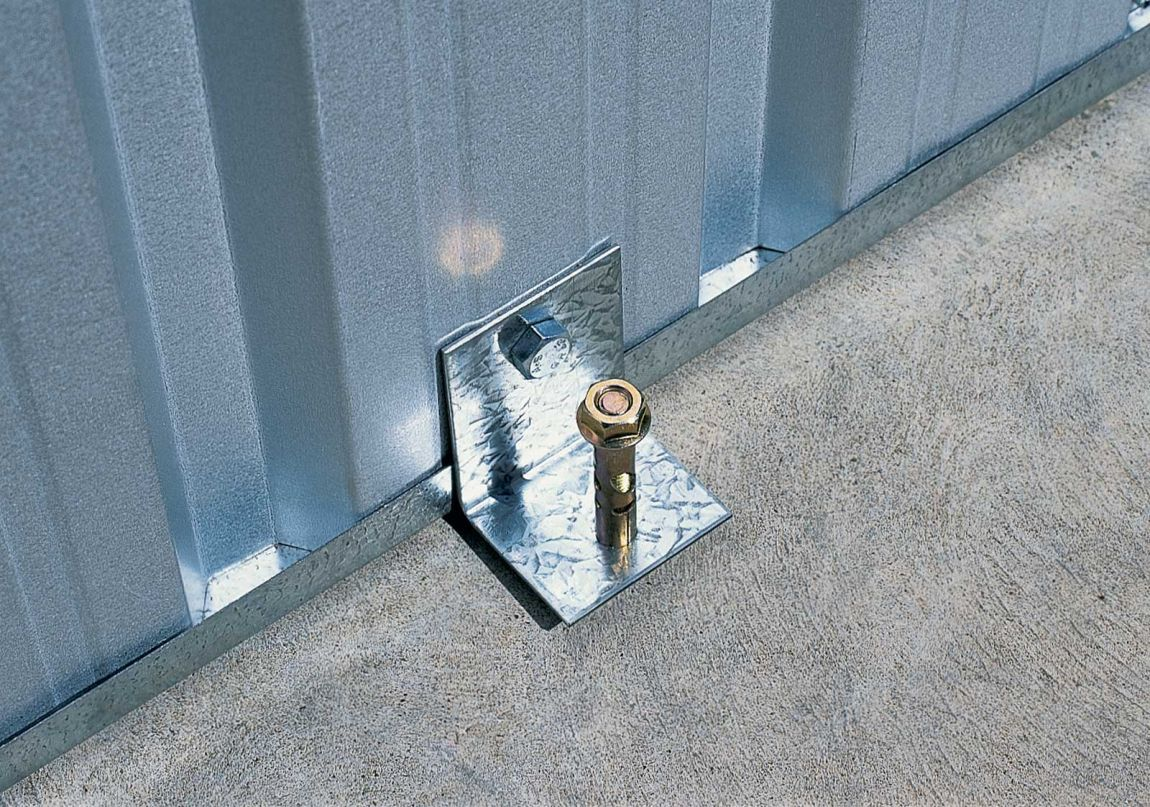
There are also corner brackets included in the anchoring kit if you order a prefab shed. Some companies don’t include anchor kits as part of purchasing prefab sheds, so you have to order anchor sets separately.
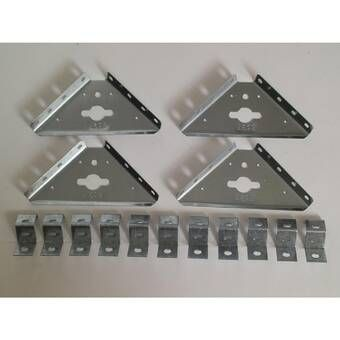
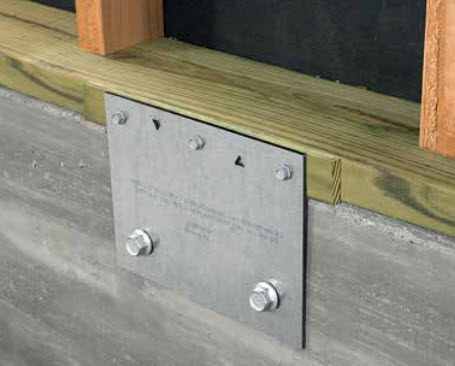
Use Side Plates To Fasten The Shed From The Outside
Side plates are usually used to anchor skids on concrete slabs. These side plates connect your skid to the concrete slab through the help of expanding bolts and screws. One side of the plate is bolted onto the concrete slab while the other side is secured on the skid. See the picture below.
Another side plate called the T-strap that is trendy comes in many different sizes and forms but performs the same function as the above-shown side plate. The most common you’ll see is the one shown below.
Augers With Straps Or Cable
This is the most typical anchor type you’ll see on sheds. It is cheap, easy to install (the only hard part is when you screw the augers into the ground), and can be easily replaced if needed. It does require regular checking to make sure that it is still performing flawlessly.
By this time, you already know how this baby works. But for the sake of consistency, I will reiterate once more. You will have to screw these augers in the ground and then thread the cable wires through the loops then secure with the wire clamps.
J Bolts For Concrete
J bolts are used when you are laying down your concrete slab for the first time. It is placed onto the wet concrete and allowed to set with the cement to create a strong hold that serves as the anchor for your shed. It comes in different lengths and sizes, so be sure that you have the right drill bit size when you pre-drill your holes.

Number Of Anchors According To Shed Size
I’ve noticed that I always mentioned “according to your shed size” when it comes to how many anchors you need for your shed, and I looked around on the internet to learn more about the regulations for this. Here is a table I found that you can use as your guide if there is no regulation regarding outbuilding. As for those with rules, the details vary from place to place, so I think it is still best to check your local building codes.
| Shed Size | Anchors |
| 1.5m x 0.78m | 8 |
| 2.25m x 0.78m | 8 |
| 3m x 0.78 | 8 |
| 2.25m x 1.5m | 12 |
| 2.25m x 2.25m | 12 |
| 1.5m x 1.5m | 12 |
| 3m x 1.5m | 12 |
| 3m x 2.25m | 14 |
| 3m x 3m | 14 |
| 3m x 3.7m | 16 |
| 4.48m x 2.25m | 16 |
| 6m x 3m | 24 |
Conclusion
And there you have it. You now have a complete guide you can use to refer back to regarding anchoring your shed to the ground. All scenarios are covered from the type of shed material you have to the kind of ground you will anchor your shed to and even the types of anchors you will use depending on the type of shed you are constructing. This is where I put my pen down and bid you a happy shed construction!
If you are enjoying reading this article then you might find our articles on Extend Basement Under Your Yard? – Here’s How and The BEST way to Secure A Portable Garage – With Pictures! worth checking out !
P.S.
That’s it for this article. I hope you enjoyed reading it and if you think it might be useful for someone else then please share it on social media, email or your own website! It really encourages us to write more content and grow the site!
Steve
If you’re interested in reading more about smart light, smart garages and smart homes checkout some of the other houshia categories including: